Broadband: Diagnosing Intermittent or Poorly Performing Connections
Although normally reliable and efficient, our modern broadband Internet connections still make use of decades old copper telephone cables laid from our properties to at least the local cabinet, if not as far as the telephone exchange itself. These contain multiple joints and are often exposed to the elements. Problems can occur and these generally manifest themselves as long pauses, disconnections or a general slowing down of the connection.
This article provides methods (appropriate to your type of connection) to assist in diagnosing a fault. It may well be that, despite following the advice below, no improvement is seen. However, after following the steps you can contact your Internet Service Provider (ISP) who will book a BT OpenReach engineer to take over where you left off. If you have not carried out the tests in advance, OpenReach may charge you for the visit if a problem is found with your equipment or wiring.
Traditional Broadband (ADSL)
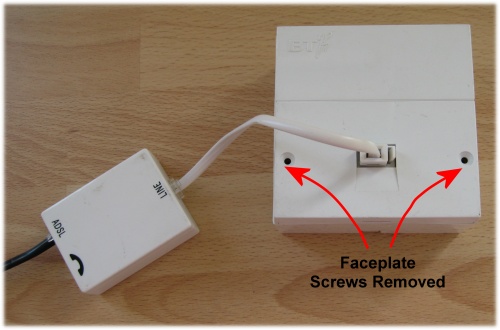
The signal your broadband router uses to connect to the Internet is added as high frequency noise at your local telephone exchange. To avoid hearing this during voice calls and to eliminate impulses from dialling, picking up/putting down the handset, etc. a filter is plugged into each socket in your property, known as a microfilter (see pictures below).
1. Line Check
Begin by locating the BT master socket (known as an NTE5) in your property and carefully removing the two screws securing the lower faceplate as shown below:
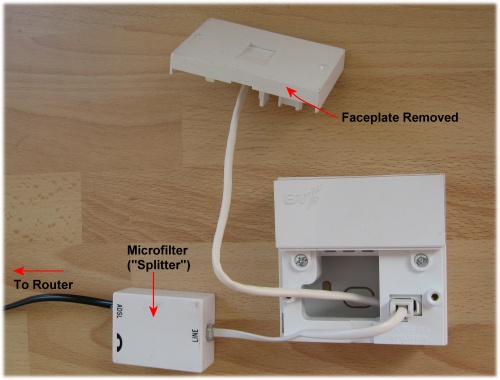
Grasping either side of the lower half of the faceplate, slide the connector gently out of the socket and be careful not to put undue pressure on any extension wiring connected to the back of it. This will reveal the test socket in the lower right-hand corner as shown below:
Start by connecting a telephone handset to the test socket and check for a dialling tone. If present, dial 17070. You should hear a recorded message stating, “This circuit is defined as…” followed by the telephone number of your line. When offered, press button 2 on your handset to select Quiet Line Test. Listen carefully at the earpiece for any noise on the line. There should be no pops, hisses, crackles, hums or any noise of any variety heard. If either the dialling tone is missing or you hear any noise during the quiet line test, report this as a fault to the company you pay your telephone line rental charges to. Only once the line fault is repaired should you continue the rest of the testing as your broadband fault may well be rectified by this.
2. Disable Extensions
With the lower half of the faceplate removed (as described in section 1) connect your microfilter and router directly to the test socket. By removing the faceplate all the internal extension wiring in your property should be disconnected from the telephone line, allowing testing of the router directly with the exchange.
Power up the router, connect a computer to it (using an Ethernet cable rather than Wi-Fi, where possible) and test for improvements. We recommend a speed test, such as the one at Zen Internet, for comparative testing.
If your broadband is still slow or intermittent with the router connected to the test socket, skip to section 3 below.
If your broadband performance has returned to normal, you likely have a problem with one of your internal telephone extensions. Diagnose this as follows:
- Remove all microfilters and telephone equipment from every extension in your property, remembering Sky™ boxes, PDQ™/fax machines, etc.
- Re-fit the faceplate to the master socket and connect your microfilter and router to it.
- Power the router on and test your broadband speed again.
- If the performance is still acceptable reconnect each device, one at a time (making sure to remember the microfilter), until the speed drops. You have then located the device causing the problem, which may well be rectified by replacing the microfilter with a new one.
- If the performance has degraded again you have faulty internal extension wiring or something near the cabling creating excessive electrical noise. Have the extension wiring checked by a professional. Internal wiring services are not included in BT's line rental fee and they will make an additional charge for this work.
3. Replace Microfilter
Microfilters contain components (capacitors) to perform their filtering that degrade with use over time. They are also susceptible to high voltage shocks, which may occur during electrical (thunder) storms even if the telephone line is not struck directly.
Power down the router and remove the microfilter from the test socket. Replace it with a new (not a previously used, discarded and potentially defective) one and restart the router. Re-run the tests in section 2 to see if the new filter has resolved the problem. If it has, be sure to dispose of the old microfilter so that it will not get used again! Otherwise, proceed to section 4.
4. Replace Router
Once all other components have been checked, it is possible that the ADSL modem built into your router may have developed a fault. Without expensive test equipment it is impossible to verify this. The simplest solution is to obtain (or borrow) a new (or known-working) router and test this as described in section 2 to see if it resolves the problem. If it does, it may be necessary to permanently replace the old router and ensure it is disposed of so that it does not get used again.
Fibre Broadband (VDSL/FTTC/Infinity™)
With fibre broadband your router connects to a BT provided fibre modem via an Ethernet cable, rather than directly to the telephone line. The signal this modem uses to connect to the Internet is added as high frequency noise at your local street cabinet, where the fibre optic cable terminates. Unlike traditional broadband, no microfilters are needed as the filtration of the signals is carried out at the BT master socket.
Due to most of the equipment being supplied and maintained by BT OpenReach, there is much less diagnostic work to carry out in the event of difficulty.
1. Line Check
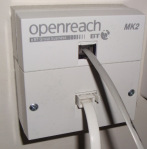
Begin by locating the BT master socket (known as an NTE5) in your property as shown below:
Connect a telephone handset to the bottom socket and check for a dialling tone. If present, dial 17070. You should hear a recorded message stating, “This circuit is defined as…” followed by the telephone number of your line. When offered, press button 2 on your handset to select Quiet Line Test. Listen carefully at the earpiece for any noise on the line. There should be no pops, hisses, crackles, hums or any noise of any variety heard. If either the dialling tone is missing or you hear any noise during the quiet line test, report this as a fault to the company you pay your telephone line rental charges to. Only once the line fault is repaired should you continue the rest of the testing as your broadband fault may well be rectified by this.
2. Reset Modem
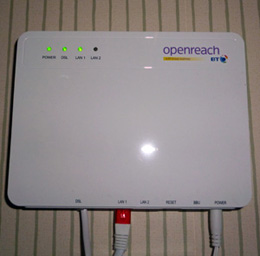
Locate the fibre modem, which should be installed near the master socket and will be look similar to the one below:
Check the cable from the top of the master socket to the fibre modem is securely fastened at both ends and inspect it for any damage. Reset the modem, either by pressing the Reset switch or removing the power connector for a few seconds before replacing it.
When the modem is operating normally the power light should be on and solid. Initially the DSL light will blink, but after 30 seconds or so it should become steady to indicate a connection has been established with the street cabinet. Should this not happen contact your Internet Service Provider (ISP), who will be able to log a call with BT OpenReach to investigate.
If the lights indicate correct operation of the modem proceed to section 3.
3. Reset Router
Locate your router, which will be connected via an Ethernet cable to the LAN1 port of the fibre modem (see picture above). Check the cable is securely fastened at both ends and inspect it for any damage, replacing it if any is found.
Remove the power supply from your router for 30 seconds or so. Reconnect the power and observe the LAN1 light on the fibre modem. It should light after a few seconds and then begin flickering as the router tries to connect to the Internet. If this does not happen, replace the network cable and try again.
Finally, using the documentation delivered with your router, check the PPPoE username and password match those supplied by your Internet Service Provider (ISP). If you still have problems connecting, contact your ISP for further assistance.


